This last InDesign lesson is a bit of a mixed bag: we discuss multi-page documents, how to export for printing, and some "small useful things".
1. Multi-page documents
Let’s create a multi-page document (a book) with facing pages and use the Parent Page to set page numbering and running titles. A Parent Page is a page which contains elements which are common to multiple pages in the document.
Create a new InDesign document…
▷ A4 Portrait with 32 pages.
▷ Make sure that the number of columns is set to 1.
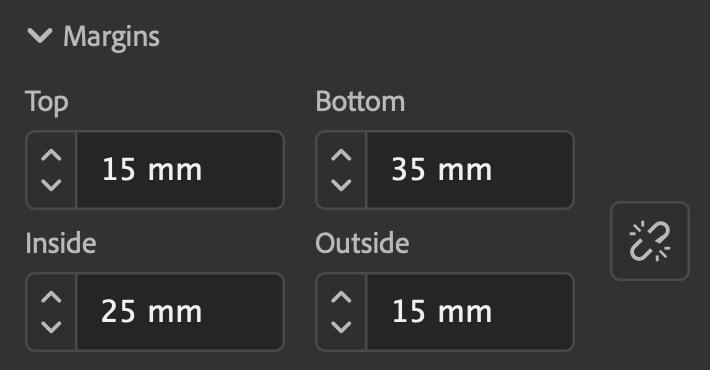
▷ Margins as shown here. Note that the inside margin is larger than the outside margin because content can be closer to the outside edge of a book than to the inside, where the book spine is. The bottom value is quite large because we want space for page numbers and running titles beneath the content.
▷ Make the document bleed 3mm throughout.
▷ Click on Create and you have a new InDesign document.
Let’s create page numbering and running titles, and to do this you need to work on the document’s Parent Pages.
▷ Open the Pages Panel and see how the pages are shown: Parents on top and content pages below.
▷ Double-click on the A-Parent page to open this parent.
▷ As described above, the Parent page is for elements common to multiple content pages. You can have more than one Parent page, with unique names. Here, we will have just one (double) Parent page applied to the whole document.
▷ While still on the Parent page, create four text blocks at the base of the document as shown below (and note the alignments).
▷ The “A” is a page number, and to insert this go:
.
▷ Have a look: scroll through some document pages and note that page numbers and running titles are now inserted.
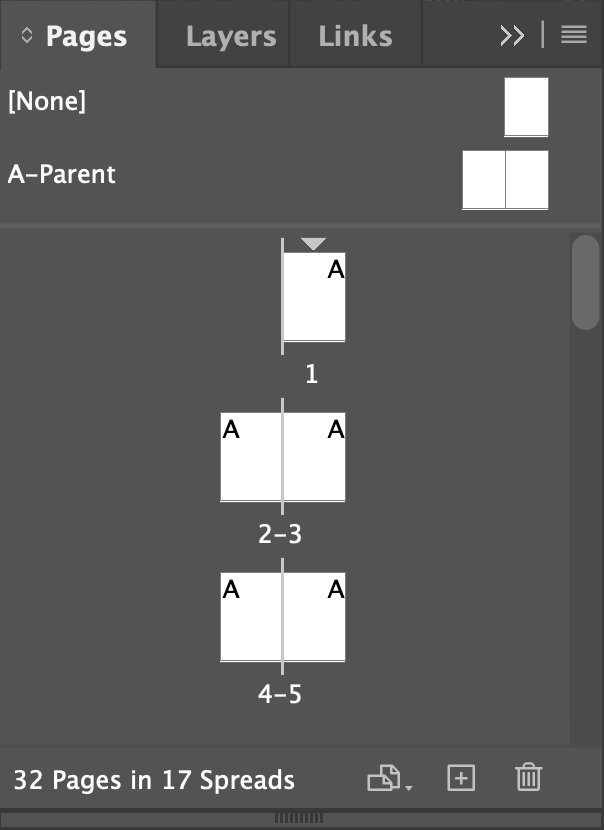

▷ Assume that on page 4 you do not want the running title nor page number: with the Pages Panel open drag the Parent page “[None]” onto page 4.
▷ If, on a page, you want to edit a parent page element, press ⇧⌘ and click on the element to modify it.
▷ To add more pages, do one of the following from the Pages Panel: drag a parent page to where you want the page inserted, or click on the “Create new page” symbol at the bottom of the panel.
2. Printing a document
Before sending a document for printing, it is good practice to first check that there are no errors. In the thin strip at the bottom of the InDesign window, you should see a small green dot next to the message “No errors”. If you see a red dot with a message like “1 error”, then click on the adjacent downward arrow and click “Preflight” and this opens the Preflight Panel where errors are listed. Click on each error and rectify it.
For professional offset or digital printing
In modern times, you export your InDesign document as a PDF when you want to have it printed. Before doing this you need to make sure that all images used have the correct colour profile — this is covered in another section.
▷ To create a for-print-PDF, go or ⌘E, choose “Adobe PDF (Print)” and click “Save”.
▷ And an Export window opens. Required settings differ depending on the printer you will be using (and this you need to find out), but the screenshot below shows typical for-print settings
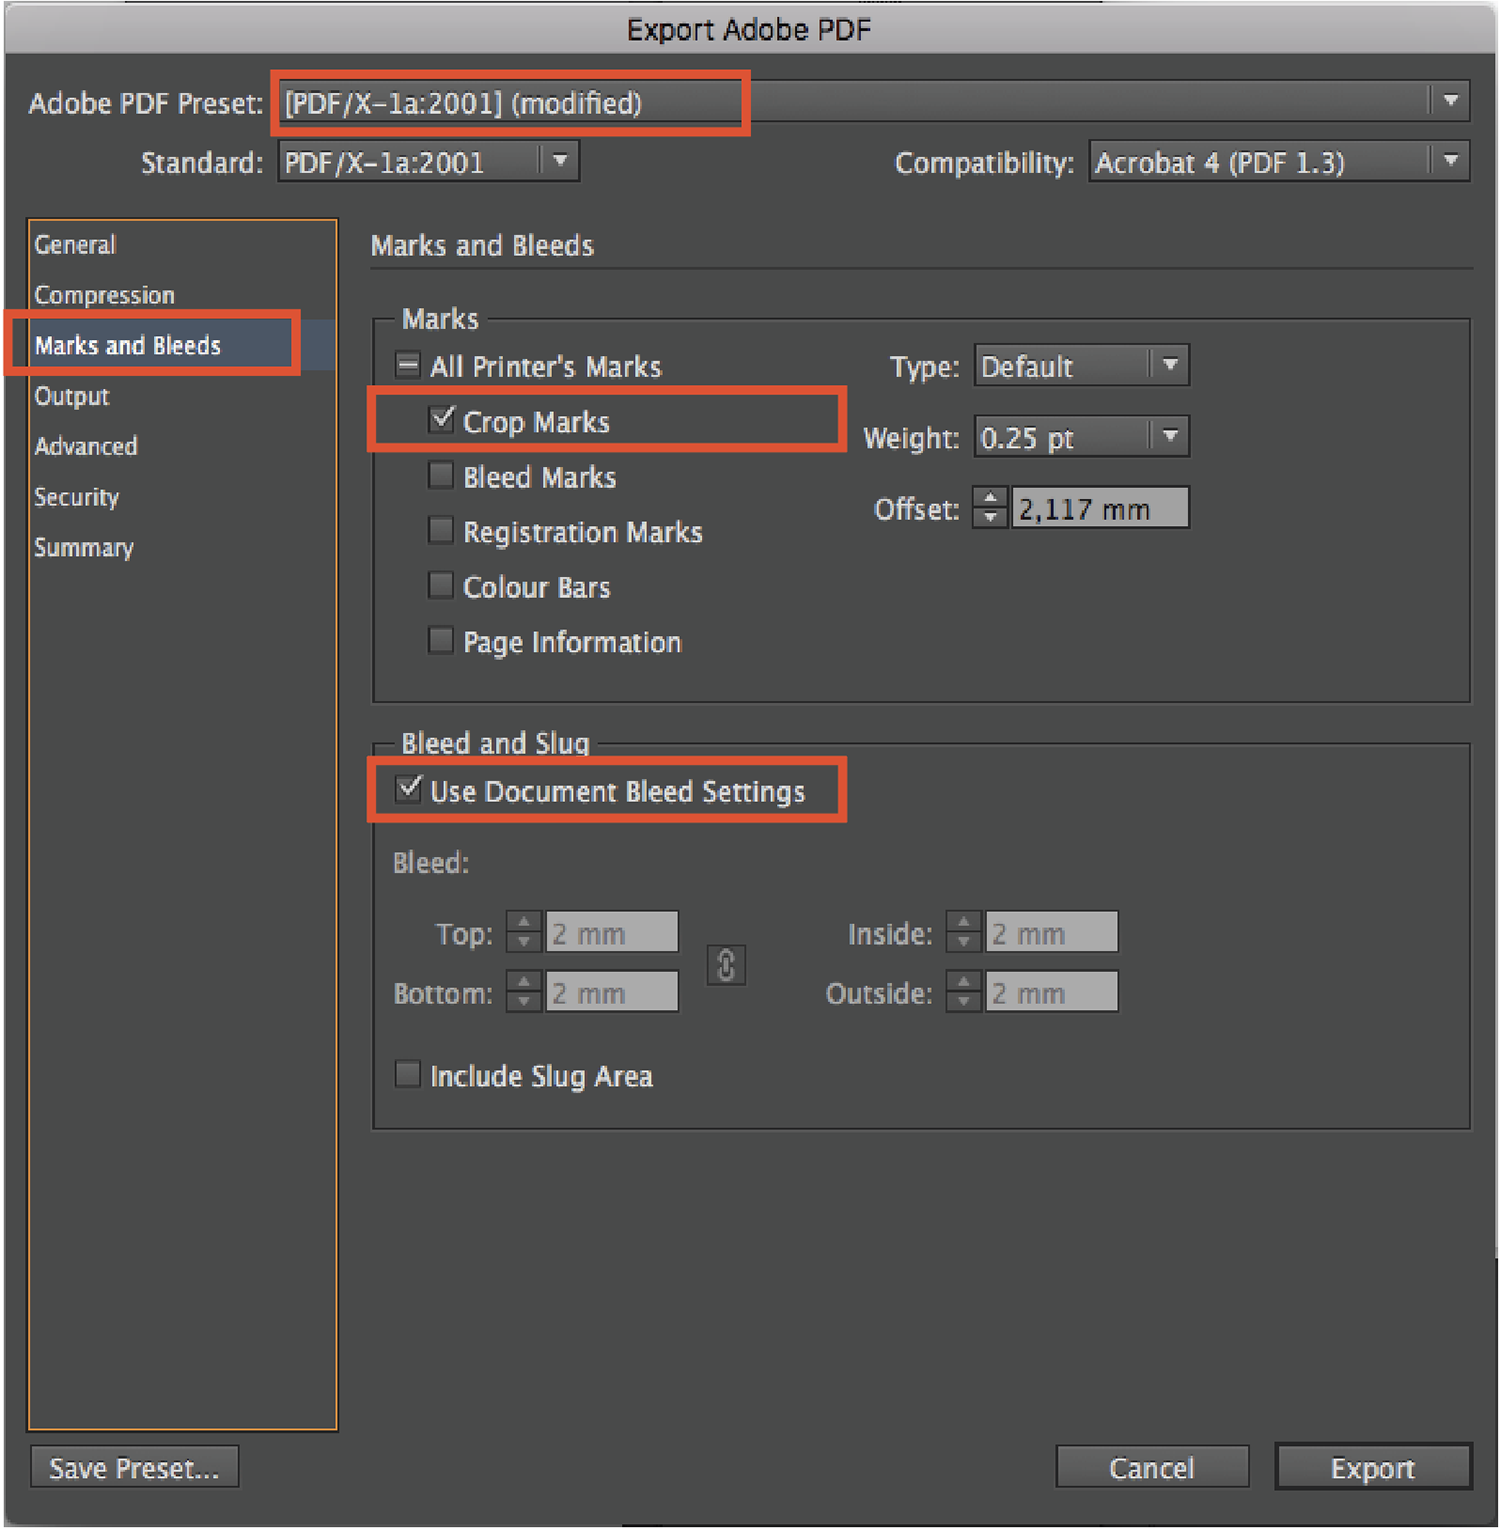
▷ After you have carefully input all the correct settings, click on Export.
For internet and office printing
For exporting your InDesign document for use as a downloadable electronic document on the internet or as an attachment to an email, you as above go or ⌘E, choose “Adobe PDF (Print)” and click “Save”. But you choose a different Adobe PDF Preset.
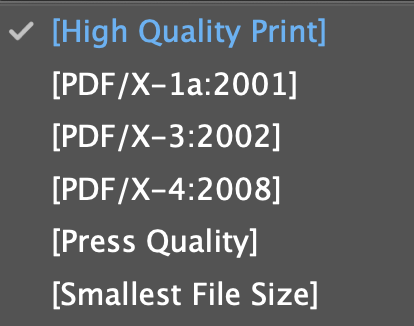
▷ For electronic documents try [Smallest File Size] first but if you need more print quality then try [Press Quality].
▷ For office printing use [High Quality Print].
▷ Note that once you have chosen the preset you can still work with the other PDF settings.
▷ Importantly, note that for office printing, content cannot go to the edge of the document — and you will need to adhere to the printing margins of the particular printer.
Remember that for offset printing you require a document bleed; for internet and office printing you do not have a document bleed. Such is life.
3. Small text editing things
The nonbreaking space, small caps, drop caps, and text wrap: these are some of the "little things" that make a difference while at the same time being relatively easy to implement.
Download the class material from qoolcat.com/down/indesign-4.zip.
Nonbreaking space
Open the file “indesign-lesson-4.indd“.
▷ At the end of the first line in the second paragraph, there is a “2,333”. But the “2,333” and the following “cm” should be on the same line, and for this we use a nonbreaking space.

▷ Delete the space (the blank) between “2,333” and “cm” and replace this with a nonbreaking space — with ⌥⌘X.
▷ Now in two lines below, “St” and “Augustine” are on two separate lines with “St” being out on its own: this is not wrong but is inelegant. You should insert a nonbreaking space here too.
In the screenshot above, the name “St Augustine” is hyphenated: you would never hyphenate a proper noun.
You should always scan a document just before it is completed, to check for the above issues.
Small caps
▷ Select “oecd” in the first line of the third paragraph.
▷ Then, in the Control Panel, click on the Smallcaps icon as indicated here.
Note that Smallcaps for capital letters within texts are far more elegant than normal capital letters.

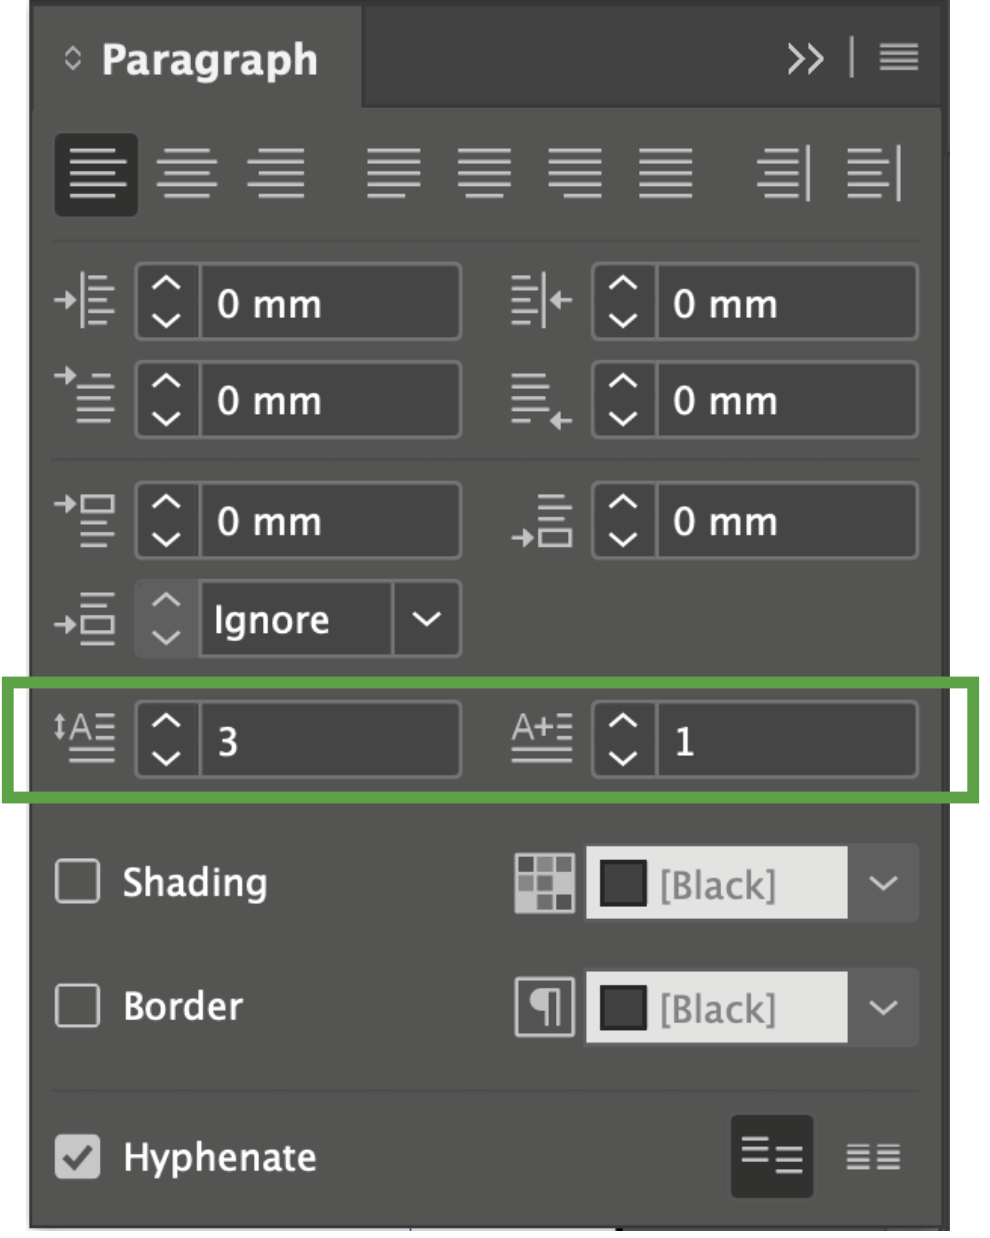
Drop caps
▷ Mark the very first character of the text, in this case the “A”.
▷ Go to open the Paragraph Panel.
▷ Key in something like as shown in the diagram here.
▷ Experiment.
Text wrap
▷ Drag the image halfway into the text.
▷ Open the Text Wrap Panel, with .
▷ With the image selected, experiment!
4. Packaging InDesign files
Let's assume that you have a large InDesign document with many linked images and unusual fonts, and that you want to archive this, or send this to somebody else for further work — you would then need to assemble the InDesign file plus all the linked graphics and fonts. InDesign can do this automatically.
▷ To assemble and package an InDesign document with all its linked files into a single directory, go .
The rest is obvious.
5. Footnotes, endnotes, table of contents, index, hyperlinks and bookmarks
InDesign has many useful capabilities not covered in the course, and such features are easy to master, for example…
Footnote: A document footnote is an annotated reference placed at the bottom of a page, typically used to provide additional information, explanations, or citations. Footnotes are usually numbered sequentially throughout the document or chapter, and indicated by a superscript number or symbol in the main text. You can decide whether to have a continuous numeration or to restart numbering on every new page.
Endnote: same as a footnote, but placed at the end of a document chapter or at the end of a document. If it is for a whole document, you can decide whether to have a continuous numeration or to restart numbering from 1 onward on every new chapter.
Table of contents: InDesign can generate this automatically — but you would use this only for a long document with many headings and subheadings, otherwise this is easier to do manually.
Index: If you mark each word you would like to have indexed, InDesign can then create an index for you.
Hyperlink and bookmark: For documents that are read as an online PDF, you can create hyperlinks so that clicking on a link opens a website page; you can create anchors (a bookmark), so that you can reference a part of a document — a clickable link to an anchor point.
When exporting an InDesign document as a PDF, you need to click the Bookmark and Hyperlink options if you want to include them.
6. QR codes
It is easy to generate QR codes in InDesign.
▷ Just go
Choose between a hyperlink, plain text, text message, email or business card.
