This lesson is a bit of a mixed bag. First we look at how to create a panorama from several photos, then we learn how to cut something out of one image and place it in another image and a bit more, and then we address portrait retouching.
And finally, we address Photoshop's new Artificial Intelligence (IA) based functionalities for example Generative Fill. These are (in many instances) game-changers, and influence the way we will be using Photoshop in the future — but nevertheless, one needs to be able to use the more "basic" functionalities — as often the automatic AI stuff, although excellent and mindblowing, is insufficient.
1. Creating a panorama
Download the class material from qoolcat.com/down/photoshop-3.zip.
▷ Unzip, and open the directory (the folder) in the Adobe Bridge application. To open a folder in Bridge, either drag the folder to the Bridge icon in your Menu Bar, or just open Bridge and navigate to the folder.
We are going to create a panorama out of three photos (that were taken quickly and without a tripod).
▷ Select all three “0_berlin-mountmitte…” photos in Bridge. Go , then click OK.
▷ Crop to your liking.
If you want to save this image as a JPG, you will first need to flatten the three layers into one layer, then go .

2. Cutting out and placing somewhere else
▷ Open “2_by-the-sea.jpg” in Photoshop.
▷ Open “1_hot-air-balloon.jpg” in Photoshop, so we now have two images open in Photoshop.

We are going to cut out the balloon and place it in the by-the-see image.
Go to the 1_hot-air-ballon.jpg image in Photoshop, and accurately select it…
▷ Select the Object Selection tool W. This then displays the Select Subject button in the Tool Bar.
▷ Click on the downward arrow on the right of the “Select Subject” button, and Select “Cloud (Detailed results)”
▷ Now click on “Select Subject”, and Photoshop will correctly select the balloon.
▷ With the subject now selected, go , or ⌘C.
Go to the 2_by-the-sea.jpg image in Photoshop…
▷ Paste what you have just copied by going , or ⌘V, and click “OK” to the profile mismatch warning.
▷ Make sure that, in the Control Panel (that’s the bar at the top), the “Show Transform Controls” is selected.
▷ Drag and resize to place the image to your liking. To distort the ballon (assumibng you actually want to do this), hold down the the Shift-Command keys ⇧⌘ when dragging the corner points.
▷ The balloon is too bright. So create a Hue/Saturation adjustment layer (like you did in Photoshop Lesson 2), and in the layer properties reduce the saturation to maybe -35.
▷ But this has desaturated the whole image so make the layer into (what is called) a clipping mask, by going , or ⌥⌘G. A clipping mask is a mask that applies only to the layer below.
But Photoshop 2026 has a new Harmonize capability which would use artificial intelligence to, well, harmonise the balloon with the background. Let’s try it.
▷ Delete the clipping mask layer from the Layers panel.
▷ With the balloon image layer selected in the Layers panel, click on Harmonize from the floating contextual taskbar, or go .
Cool!

Again, If you want to save this image as a JPG, you would first need to flatten the Photoshop layers.
3. Replacing the sky
▷ With the Background Layer selected, go , and play with the settings and choose another sky.
▷ Maybe reposition the balloon slightly, if you want to.
▷ And, just because we can, let’s flip the image horizontally — go .

The author concedes that a hot air balloon on the coastline is potentially in trouble!
4. Body and portrait retouching
Photoshop has a vast arsenal of tools and techniques for editing the human body and face. When doing such retouching, do not overdo it so as to make the final result look like Frankenstein. The result should be subtle.
4.1 Puppet Warp and Liquify
Here, Puppet Warp and Liquify is about selectively altering the shape of the human body.
☐ Go through this video (11’25”).
I sometimes use liquify () to slightly drop shoulders (Forward Warp Tool or W, top left) because, when people are nervous when being photographed, they often lift their shoulders.
Another way to quickly and effectively slightly slim a subject (body and/or face) is to elongate by up to 5%:
go ⌘A then ⌘T; then drag up to elongate (never more than) 105%.
While you are looking at the Liquify filter, open a portrait image of yourself or a friend and try the Face-Aware Liquify panel on the right. Amazing?
4.2 Whiten teeth, brighten eyes, smoothen skin, soften bags under the eyes, etc.
Powerful, and as an alternative to selecting people parts using the Camera Raw Filter (as described in Photoshop Lesson 1), is to use the select people functionality within the main Photoshop space: see this video from 15:26 to 17:26. When Photoshop does not select with enough precision, you can modify a selection as was explained in Photoshop Lesson 2.
Change colour of hair
As an alternative to using the Camera Raw filter, use the select people functionality as described above. To, for example, henna somebody’s hair, select the hair, then apply the Selective Color adjustment layer, and using the Neutrals colour, slightly move the cursor in the Cyan direction.
Whiten teeth and brighten eyes
I used to teach this as intricate Photoshop techniques, but now this is easy to do within the select people functionality as described above. For whitening teeth, select the teeth, then use an adjustment layer to either increase the exposure or to desaturate the colour. To brighten eyes, just use the same technique.
Smoothen skin
Same comment as above — it has become really easy. Use the Camera Raw Filter or since 2021 the really cool .
Soften bags under the eye
Duplicate the layer, then use either the Patch Tool, Spot Healing Bruch Tool, Healing Brush Tool, or Remove Tool to remove the bags under the eyes. Change the layer mode to Lighten, and then reduce the opacity of the layer to soften the effect.
Reduce wrinkles and blemishes
To reduce wrinkles and blemishes, I use exactly the same method as described above. Some blemishes you might not want to remove completely.
Remove face shine
To remove face shine caused by perspiring or by greasy skin…
▷ Create a new layer (from the layers panel).
▷ With the Eyedropper Tool I, select a point on the skin right next to the shiny surface (this selects the colour).
▷ Select the Brush Tool
—▷ hardness: 0%; size: almost as large as the shiny skin area
—▷ Mode: Darken
—▷ Opacity: 15% approx.
▷ Brush over the shiny skin.
You can see what changes you have made by clicking on and off the view-layer symbol.
As a reminder: when you are finished you can flatten the image .
Or, optionally (maybe do not bother to learn this), for a slightly more sophisticated remove face shine procedure: watch this video (5:46″).
5. Selecting a portrait with Select and Mask
When selecting a portrait to replace the background or to move the person to another scene, selecting the hair can be tricky. In recent years Photophop’s Select and Mask functionality has become powerful. Watch this video (10’06”) starting at 1’37”, which explains how to key out of a greenscreen but is nevertheless applicable to any background.
In this video, just after 5’50”, the narrator is suggesting that you should change the value Master to Green in the Hue/Saturation adjustment panel. But here is a more precise way to set the colour:
▷ Make the background layer visible by un-hiding it.
▷ Select the colour marker icon (the hand-with-index-finger as shown here with the orange box), and click on a representative green on the background layer.
▷ Hide the background layer again.
▷ You can optionally move the sliders (the second box shown here) if you wish to refine the green (or any other colour) selection.

6. Neural Filters
Relatively new to Photoshop is the AI-intensive Neural Filters, which is getting more options with every major update.
▷ Go and have a good look.
Some of the useful neural filters that I use include:
- Skin Smoothing
- Makeup Transfer, where Photoshop will mimic the makeup of one portrait image to another portrait
- Colorize, where Photoshop will use AI to guess and apply colour to a monochrome image
- JPEG Artifacts Removal where artefacts from JPEG compression are removed
- Photo Restoration for improving old photographs
…and there are many more.
Optionally, watch this video (7’10”), which includes some repetition and some useful new stuff.
7. Generative Expand and Generative Fill
Photoshop has released new AI-based functionality like Generative Fill. Powerful. To use this, you need an internet connection, and the "calculations" are accomplished online on the Adobe servers.
▷ Open “3_venice.jpg” in Photoshop (it is useful that you have a current version of Photoshop 2024 installed).
We are going to add some material to the image both bottom and left.
▷ Click on the Crop Tool, and in the options bar, check that Fill is set to Background (default) — Generative Content Aware and Expand would also work.
▷ With the Crop Tool, add about 10% to the bottom and left of the image, as shown here.
▷ Click Generate Expand from the contextual taskbar, check that the option selected is “Firefly Fill and Expand” and, without giving any prompt text, click Generate. A taskbar shows the progress and after a while, Photoshop has filled the area (using AI).
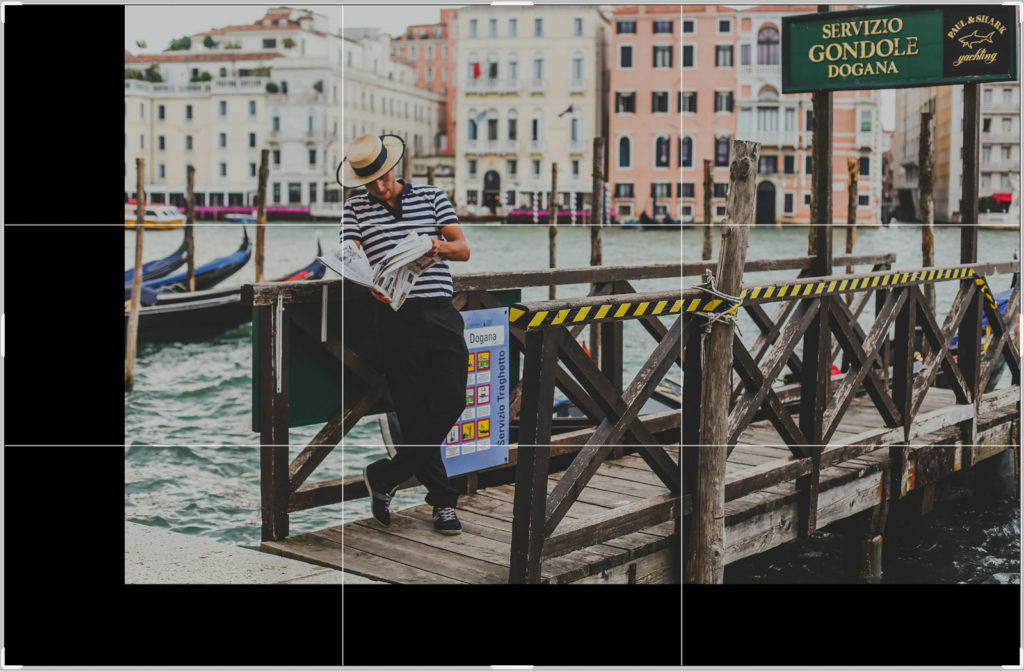
Original photo by Christie Kim on Unsplash
▷ From the Properties panel you can choose one of three alternatives. You can click Generate in this panel for three more possibilities. So choose one.
Impressive?
▷ Flatten the image⇧⌘E (or go ).
Note that Photoshop has done a credible job of guessing the fills, including the concrete in the foreground, the boats, and the buildings in the background.

So now we are going to add a dog lying on the concrete foreground.
▷ With the Lasso tool select an area where a dog could be lying on the concrete, as shown here.
▷ Then go Generative Fill but for the prompt type in “dog lying”.

See the result. The size of the chosen selected area is important so you might need to try again with a different selected size.
▷ From the Properties panel you can (as you did above) choose one of three alternatives. You can click Generate in this panel for three more possibilities. So choose one.

There are of course many further uses for Generative Fill for example you can remove obstacles like people who are in front of complex backgrounds, completely replace the background of a scene with another, add elements to an object like a hat to a person, add elements to a scene like a flock of birds, etc.
View this video for further Generative Fill examples. As from Photoshop 2026, you can choose which AI engine to use via a dropdown menu. You could experiment, but “Firefly Fill & Expand” is probably a good choice.
While Generative Fill is in many instances game-changing, there is still a lot one cannot do with this functionality, so you still require your traditional Photoshop skills!
8. Photoshop 2026 — major AI enhancements
(Adobe has a credit system for using its advanced features like Generative Fill, Generative Expand, Generative Upscale, and the AI mode Remove Tool — all of which are executed on the Adobe servers. When you have exhausted your credits in a month, the generative operations continue, but they run at reduced priority (slower), and may use a lower‑quality fallback model. You can buy extra credits if needed, but most users never do.)
The Photoshop 2026 release focuses on major AI upgrades.
Firefly, Rotate Object, Distraction Removal, Reflection Removal…
Please watch this video — thoroughly— from 00:44 to 14:51.
This is what is covered…
▷ 00:44 Examples using Firefly Image 5
▷ 05:00 Generative Credits usage (your Adobe account gives you 4000 credits per month)
▷ 05:20 Layer Cleanup: you probably will not use this
▷ 06:13 Rotate Object (isolate the object, then go )
▷ 09:10 New Actions Panel
▷ 10:15 General Distraction Removal Tool — remember to click on the tick symbol in the Control Panel
▷ 13:28 Reflection Removal (go )
▷ 14:51 Dynamic Text Arch and Circle: better in InDesign
▷ 15:38 Color Swatches in Filter Gallery: this I do not get.
Generative fill with Reference Image
For using Generative Fill with a Reference Image, watch this short video, and watch this video from 8:36-11:14.
Harmonise
In an exercise above, you placed a balloon from one image to another, and used Harmonise to get colour and shadow consistency. But Harmonise is even more powerful, and can match the likes of colour (white balance), lighting, shadow, and even reflections. Please watch this video, from 01:00 to 07:30.
Generative Upscale
And (apologies if this seems a bit random, but I am trying to show the most useful functionalities), to use AI to intelligently increase the size of a small image, go. You can choose, via a dropdown, which Model to use.