1. Anatomy of a digital camera
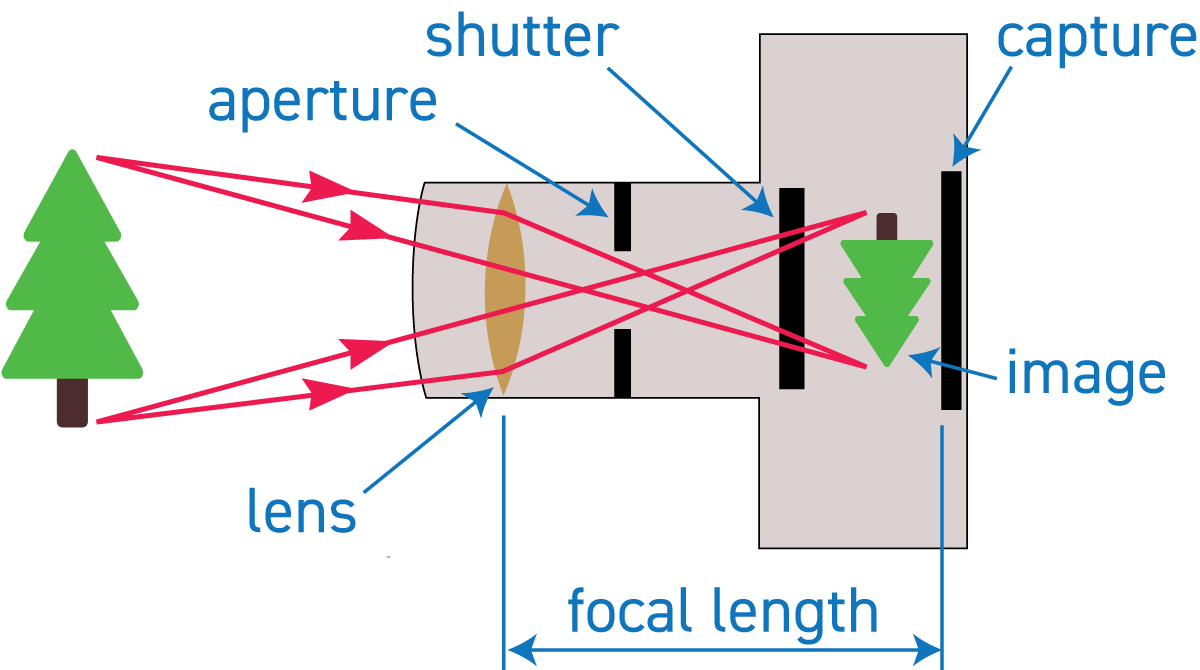
From a top-end large format Hasselblad camera to the tiny camera on an inexpensive smartphone, both have the identical basic anatomy: a lens, aperture ring, shutter, and image capture. The same applies to a movie camera.
Smartphones have an electronic instead of a physical shutter, and a fixed-size aperture.
Human (and other animal) eyes have the same anatomy as a camera, including a variable aperture, except there is no shutter (but you can decide to close your eyes).
2. Focal length
Consider the two images below: the same object taken with the same camera. What is the difference?
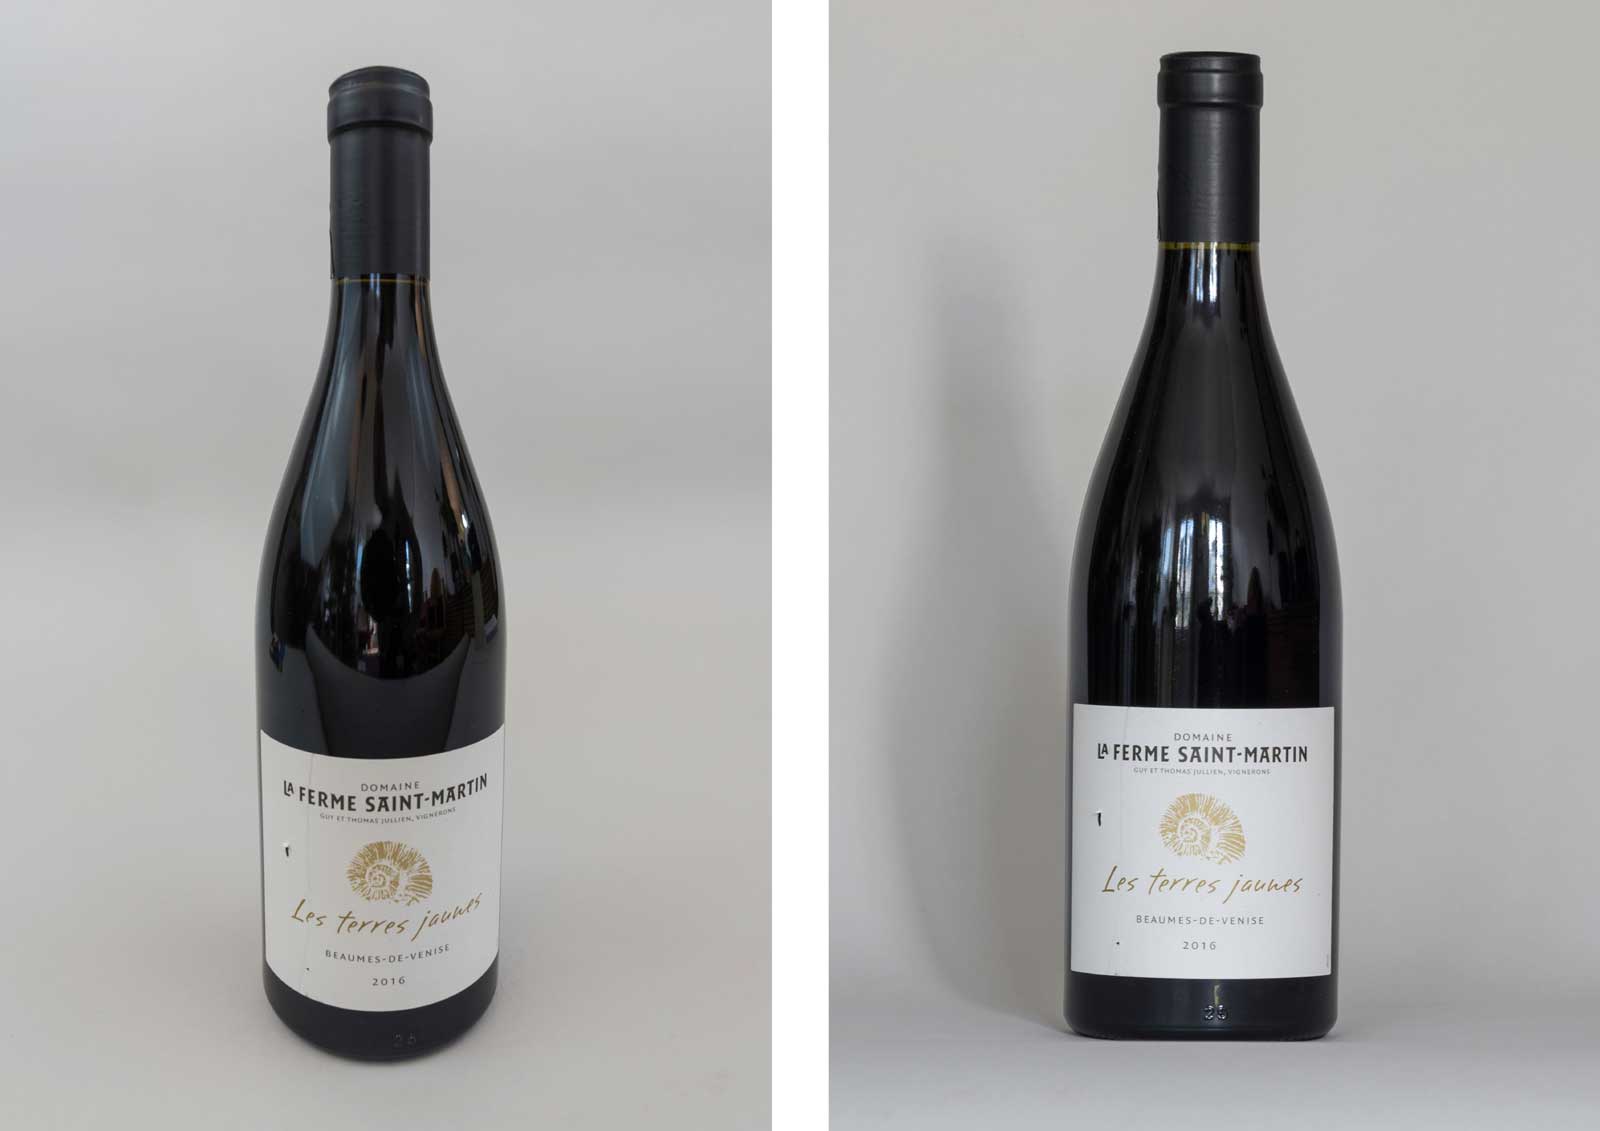
The image on the left is taken with a 35mm focal length — the camera is close to the bottle. The image on the right is taken with a 400mm focal length — the camera is far away.
Question: which is better? Answer: it depends.
Aside: smartphone selfies are seldom flattering because a short focal length portrait makes the subject’s nose, forehead, or other facial features appear disproportionately large compared to the rest of their face.
Focal length is typically stated for the “35 mm capture equivalent”.
- a focal length of 35mm or less is a wide-angle lens
- 50mm is mid-range
- 85mm to 135mm is typical for portraits
- 200mm and above is telephoto, like a view with binoculars (“tele-” as in telescope)
A zoom lens is one where you can vary the focal length optically — this is called optical zooming. Digital zooming (also called crop zooming), is where you crop out a part of the image to get the same (zoom lens) effect. When you un-pinch your smartphone you are most of the time digitally cropping, and a penalty for this is that you are cropping away pixels hence you are left with an image with a lower pixel resolution.
3. Exposure
We all know what an underexposed and overexposed image looks like. Here, for example…
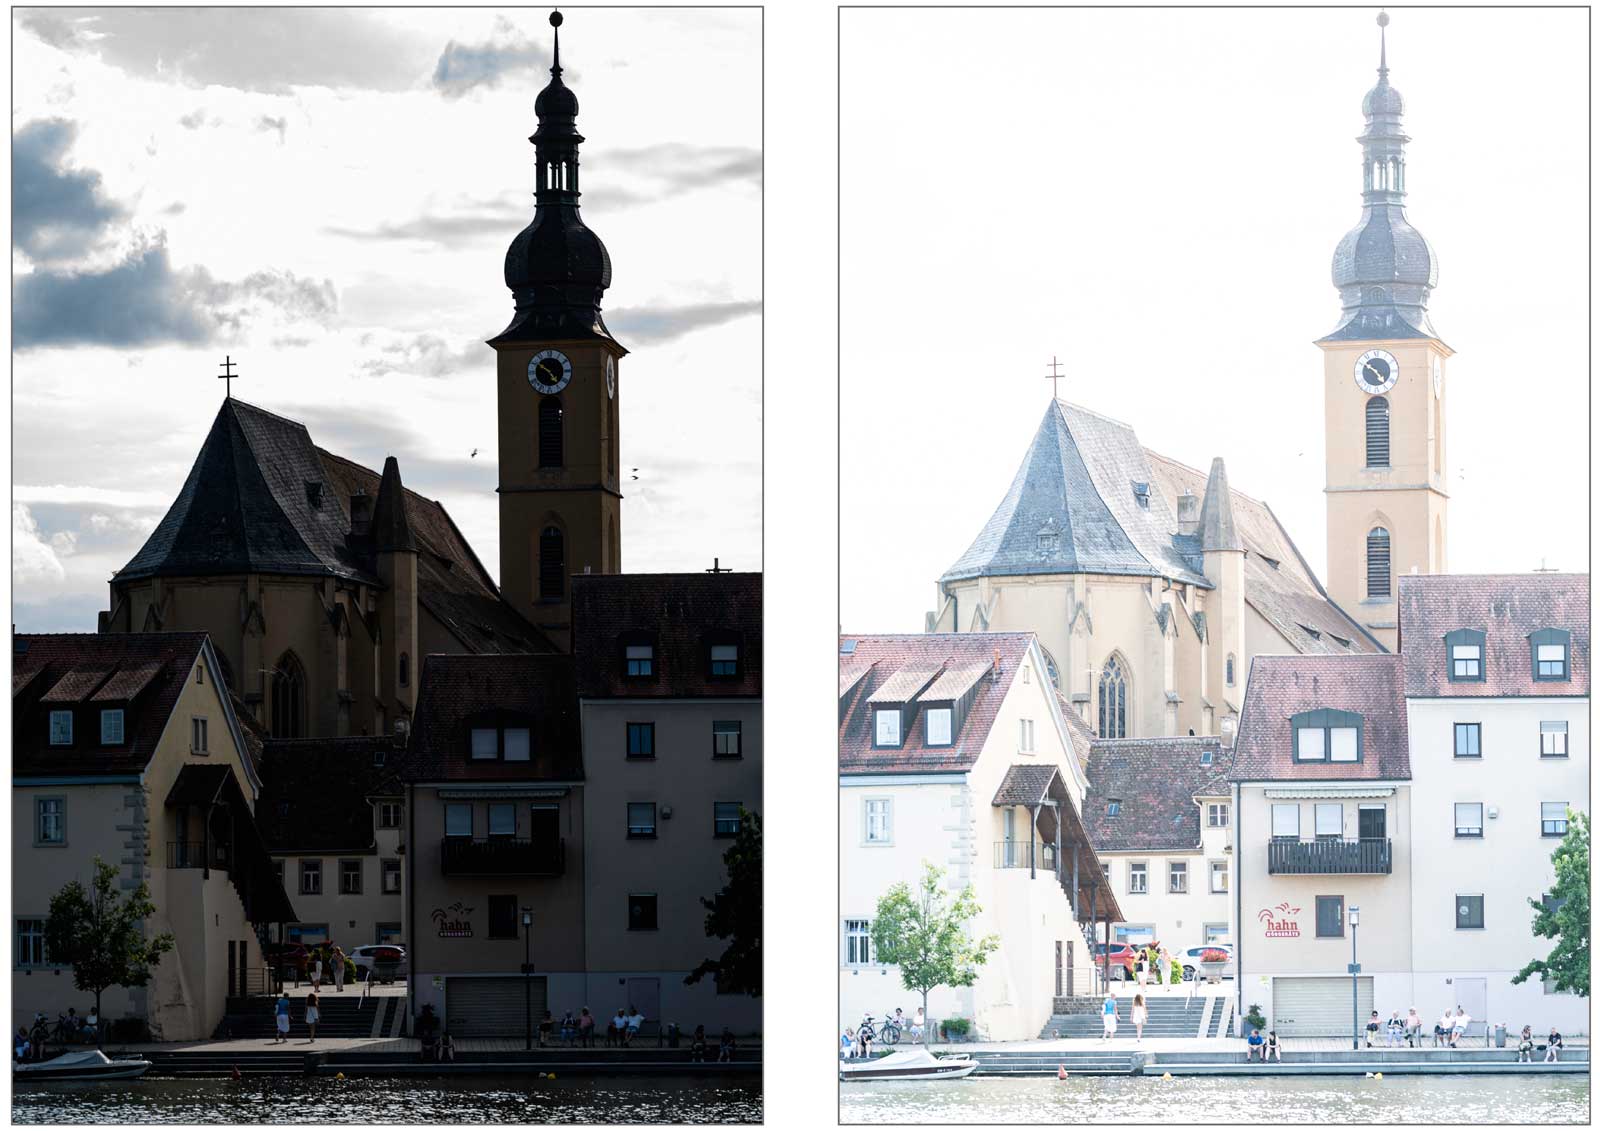
But there is a little more to this. Consider the image below…
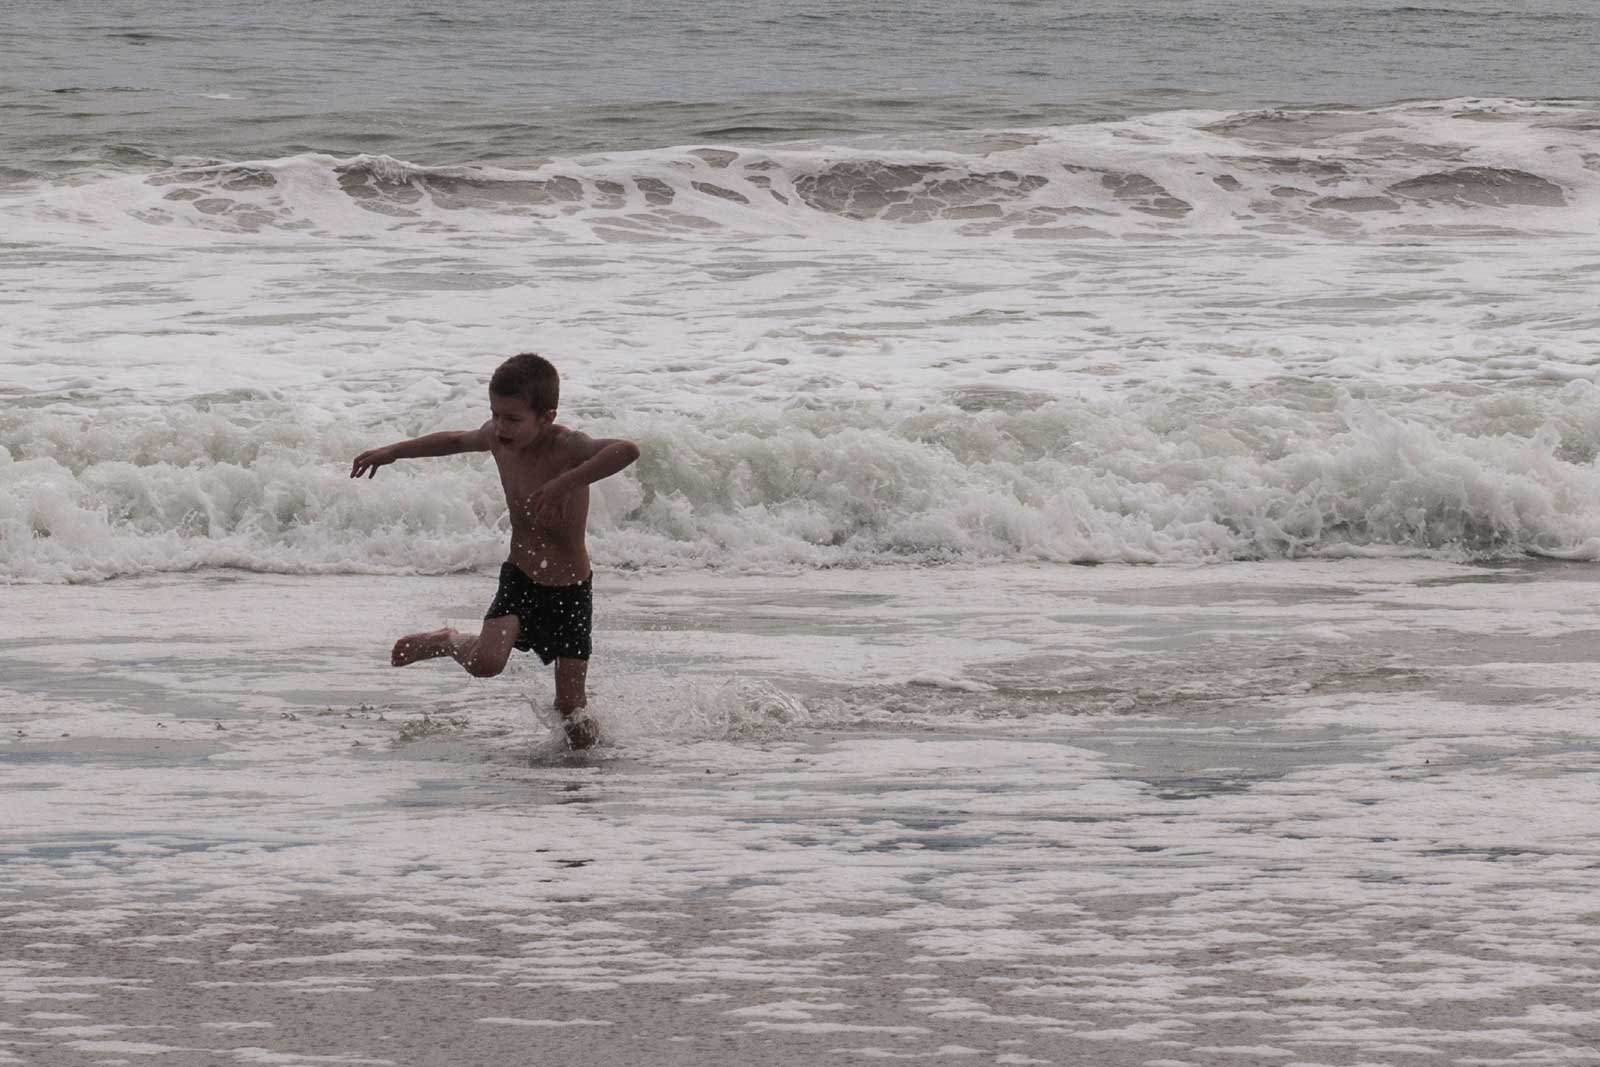
Here, the sea is correctly exposed but the boy is very underexposed. Two solutions:
- overexpose a photo like this so that the boy is better exposed (so remember this: if the image subject is differently exposed to the rest of the image, then overexpose or underexpose the image to compensate for this)
- correct this in post-production in this case by “lifting the shadows” — this will be explained in Photoshop Lesson 1.
Clipping refers to where a portion of an image is either so overexposed (extreme highlights) or so underexposed (extreme shadows) that you lose all detail. This should generally be avoided, obviously — and in Photoshop Lesson 1 you will be shown how to detect this in an image.
When taking a photograph, there are three parameters of exposure, each with trade-offs, and this is what we discuss next.
Aperture — the size of the hole
Consider the two images below…
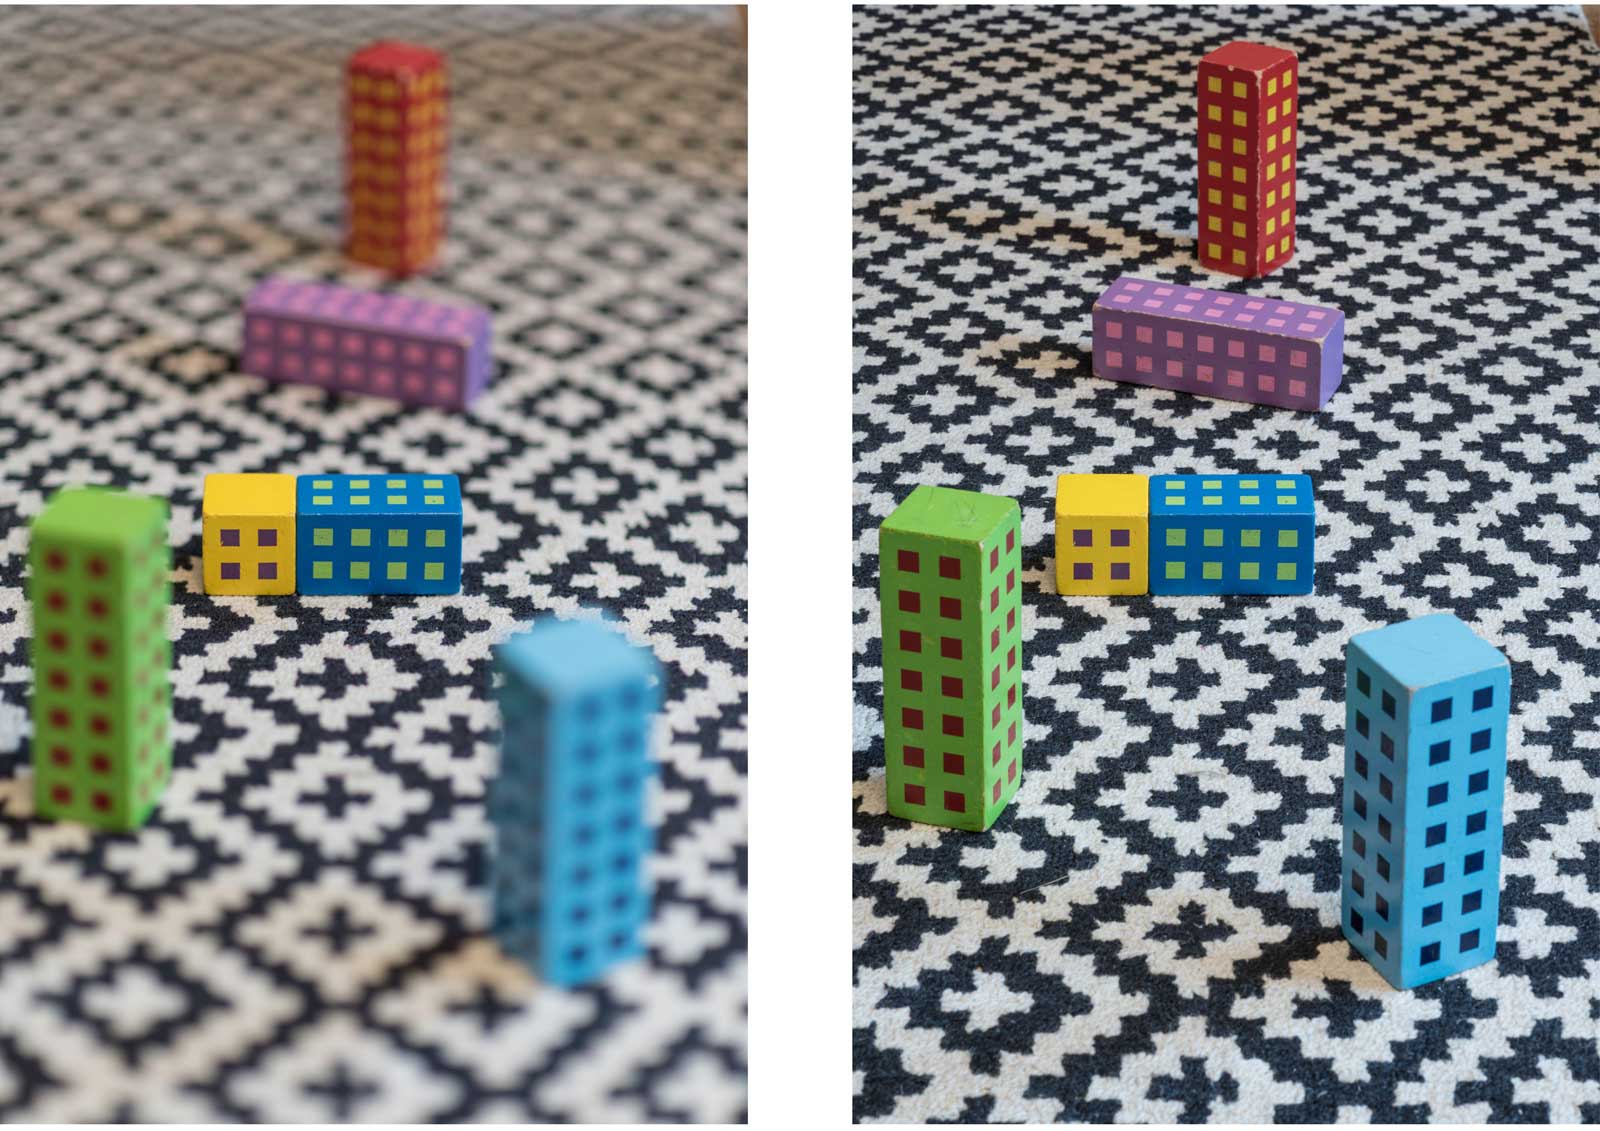
In the left photo, only a small portion of the image is in focus, and this is because this photo was taken with a large aperture (the aperture ring was wide open). Conversely, in the right photo, the whole image is in focus (which includes the foreground and background), and this is achieved by having a very small aperture, a “tiny hole” so to say.
Question: which is better? Answer: it depends.
The term used to describe whether a lot of the image is in focus is depth of field: a small depth of field means not much (of the image depth) is in focus and the opposite is a large depth of field.
Aperture is measured in “F-Stops”:
- An F-stop of F/1.4 lets in a lot of light but yields a paper-thin depth of field — this is the example on the left above.
- An F-stop of F/22 lets in a small amount of light but yields a high depth of field — the right example.
F-stop increments (each increment halves the amount of light): f/1.4, f/2, f/2.8, f/4, f/5.6, f/8, f/11, f/16. f/22…
ISO — the sensitivity of the capture
Consider the following where the magnification detail below is from two different photos of an identical scene…
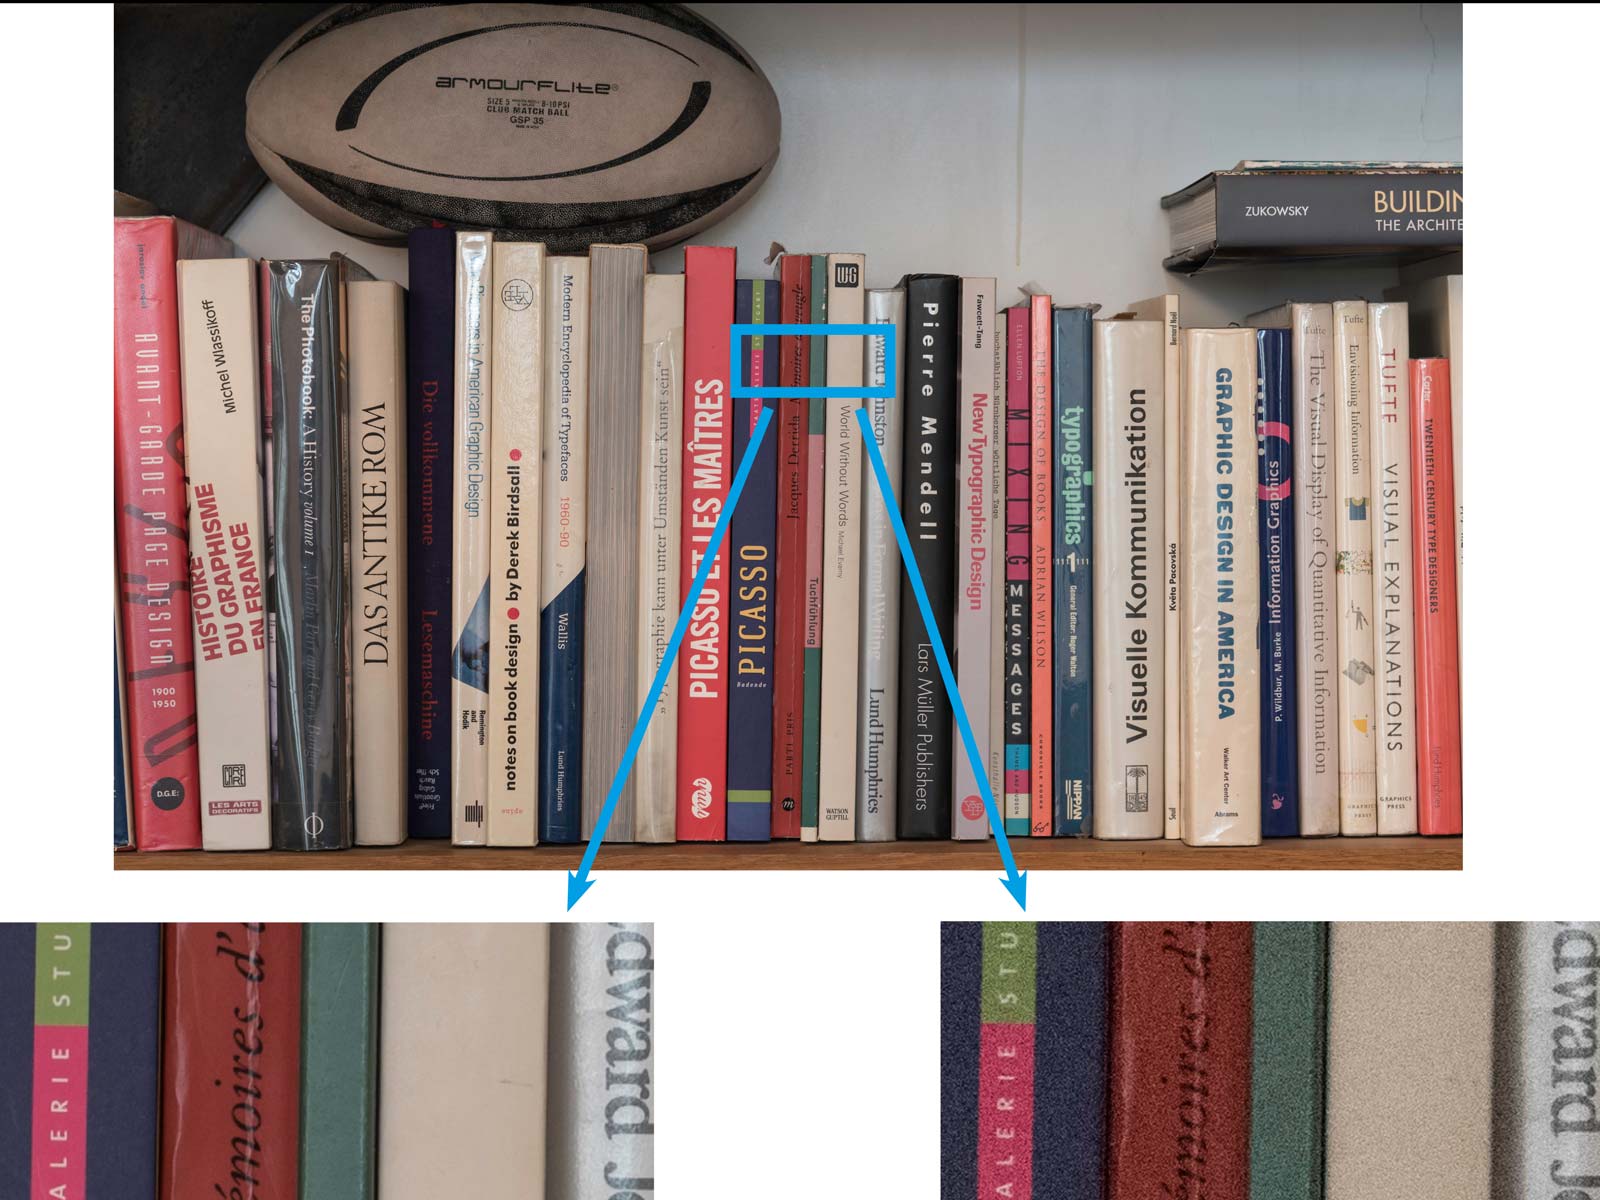
The cut-out on the right is “blurry” while the one on the left shows “crisp detail”.
This blurriness of the right cutout is called “digital noise”.
Question: which is better? Answer: less digital noise is obviously better, but there are trade-offs — which we are discussing here.
You can instruct a camera, via a setting, how sensitive the camera capture should be, and this sensitivity is measured as an ISO value:
- a low ISO (like 100) requires a lot of light for image capture and produces a crisp image
- a high ISO (12800) needs little light but produces a noisy image.
F-stop increments (each doubling of the value halves the amount of light) are typically: 100, 200, 400, 800, 1600, 3200, 6400, 12800…
So, again, there is a penalty for taking a photo using less light and in this case it is noise.
If the image above is just for an Instagram post or for a website, where the image can be relatively (relative to the total image size) small, then it hardly matters if the image is noisy as the noise is neutralised when you substantially reduce the image size. The image above is about 6000 pixels wide; Instagram requires images 1080 pixels wide — a reduction by a factor of nearly six!
If the image above is for a large poster or a book cover, then the noisy version would be a problem. You can remove noise in post-production (you learn this in Photoshop Lesson 1), but you can not put in detail that was not there.
Shutter speed
Shutter speed is measured in seconds and denotes how long the shutter is open to capture the image. A shutter speed of 2/1000 means that the shutter is open for two-thousandths of a second — this is quite a fast shutter speed. A long shutter speed, like for a night scene, might be 4 seconds.
If the shutter speed is too slow, camera-shake will cause motion blur because you cannot hold the camera perfectly still. See the example below, taken with a shutter speed of one second, and where the image is blurry…

As a rule of thumb with a hand-held camera and not much movement of the subject: a shutter speed of one over the focal length is safe, so a 60mm lens could work with a shutter speed of 1/60th of a second. This is improved to some extent by image stabilisation in most modern cameras, where the camera and/or lens detects movement and compensates in real-time. This can be improved massively if you use a tripod.
Sometimes you want motion blur, for example if you are photographing somebody on a fast-moving bicycle, you might “follow” the bicycle with your camera such that the subject is sharp and the background motion-blurry. If you are photographing a waterfall, a high shutter speed would freeze each drop while a lower speed would produce streakiness — and it becomes an artistic decision as to which is best.
Motion blur can be faked with Photoshop.
Exposure trade-offs
The above-explained exposure trade-offs are well summarised below (thanks to Hamburger Fotospots )…
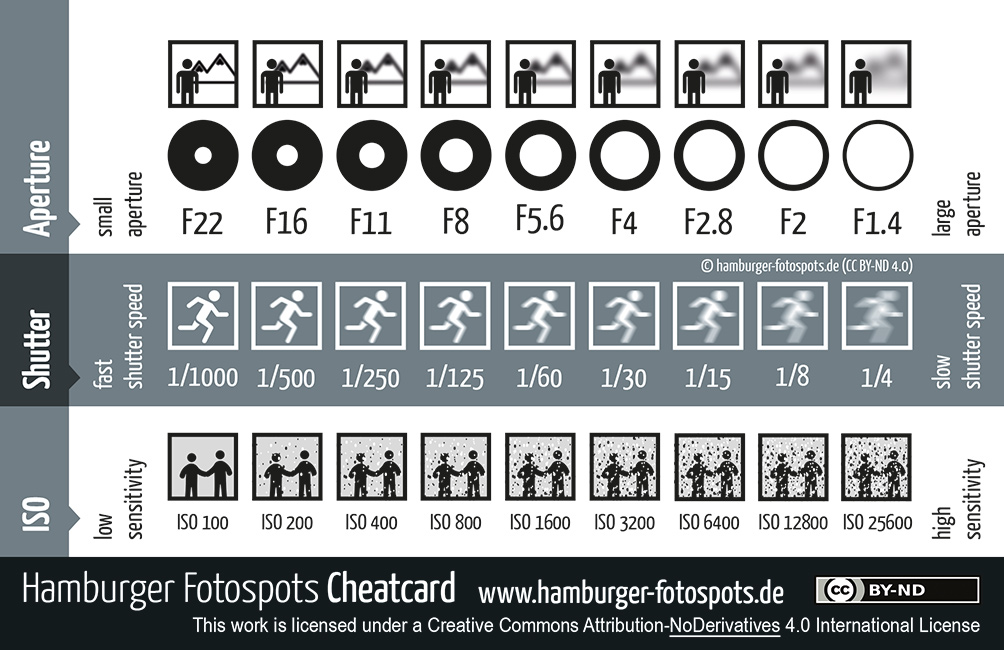
In most cases, there is never enough light. Consider for example photographing a model walking down the catwalk or a football match at night — you need to decide on the tradeoffs: in the diagram above, move one of the above items (aperture, shutter, ISO) to the left then you have to compensate my moving another to the right.
You can usually improve this trade-off situation by bringing external light to the scene or by using a tripod (which is why you see a tripod and lots of external lights at a photo studio). A flashlight is an example of bringing in external light.
When photographing a “still-life” like a vase, with a tripod, you can increase the shutter speed as much as you want (to seconds or even minutes), and the above tradeoff becomes irrelevant. Then, the light distribution might be what you are considering.
When you take a photo using your smartphone, clever software evaluates the scene and optimises the light settings. Then, after the picture is taken, the image is automatically improved in post-production for example the noise is reduced. If you shoot in portrait mode, clever software simulates a larger aperture by blurring the back and foreground.
4. Colour temperature and white balance
Except when you are looking directly at a light source like a light-bulb, a fire, or the sun, everything you see is the result of reflected light!
Because an object you are seeing is usually reflecting light that is not perfectly white, you are seeing a “tinted” image, but your brain is constantly calibrating to correct this — as if you are seeing in white light. So a white wall in the sunshine will seem white to you, even though the sun is yellow so the electromagnetic waves reaching your eye is sunshine yellow. This degree of “colour offset” is called colour temperature and is measured in Kelvin (K). Daylight has a value of typically 5600K; warm, incandescent light is 2700K; pure white light is 6500K.
A digital camera (including your smartphone) evaluates the scene it is photographing and then corrects for this colour temperature by adjusting the colour — this is called adjusting for white balance. But the camera software does not always get this right, so you then need to adjust for the white balance in post production, as is shown here in Photoshop Exercise 1.
5. The RAW advantage
When you typically take a digital photograph, the camera records electromagnetic wave signals on its capture, which is the digital information for the image. Then, clever software tries to simulate how a human eye would interpret this information: the camera guesses the colour temperature and compensates for this, stretches the grey scales (because we humans are good at distinguishing almost-black from almost-almost-black), and does a few other things. The camera then renders a JPEG image which is the final result. And then, crucially, the camera throws away all the original information.
If you set your camera to record in camera RAW (raw image format) rather than JPEG, the camera retains all the information that it has captured in what is called a RAW file. A RAW file is much larger, however it contains much more information, and this is termed the RAW advantage.
RAW images allow for greater scope in post-production, such as adjusting exposure, colour balance, and recovering highlights and shadows — this results in higher quality images with more detail and dynamic range.
Dynamic range means the difference between the darkest and brightest parts of an image that can be recorded without losing detail.
6. Composition
Composition is a big subject.
The most common error that inexperienced photographers make is placing the main feature (like the face) right in the centre of the picture — so the feet might then be cut off there could be a large area of plain sky above the head. So you need to consider the image as a whole. Also, symmetry is often not desirable in a composition.